How I built a multi-domain controller Active Directory forest using Hyper-V, configured custom sites and subnets, resolved DNS traps, and established Group Policies and gMSAs for a production-grade hybrid lab.
📖 AZ-802 Study Series: This is Part 1 of my hands-on lab series leading up to the Microsoft AZ-802 exam. If you are just starting out, check out The Ultimate Guide to Windows Server Hybrid Administrator Associate (AZ-802) Study Guide for the complete roadmap, study resources, and lab prerequisites.
Note: The Microsoft AZ-802 (Configuring Windows Server Hybrid Advanced Services) exam is currently in beta, with General Availability (GA) expected soon. Getting certified early is a strategic opportunity to get ahead and validate hybrid identity and infrastructure capabilities before the certification goes mainstream.
Why Build a Local AD Forest?
If you are studying for the Microsoft AZ-802 (Configuring Windows Server Hybrid Advanced Services) exam, or targeting corporate systems engineer roles, you quickly realize that cloud-only identity isn't the whole story. Most enterprises run a hybrid model: local Active Directory Domain Services (AD DS) synced to Microsoft Entra ID in the cloud.
To test hybrid synchronization, Azure Arc onboarding, and Failover Clustering, you need a local Active Directory forest. Without it, you have no local domain join targets, no Group Policies (GPOs), and no Kerberos authentication.
This is Part 1 of my multi-part Windows Server Hybrid Administrator series. In this post, I lay down the directory foundation manually. While setting up a domain and replication manually takes a bit of time, doing it by hand is the best way to embed the underlying knowledge, as these configuration steps and options are heavily tested in the AZ-802 exam.
In Part 2: Automating Windows Server Lab Setup, I automate this entire VM provisioning process to make future lab teardowns and redeployments instantaneous. If you prefer to deploy everything automagically, feel free to skip straight to Part 2—though I highly recommend walking through the manual process in Part 1 first to understand exactly what is happening under the hood.
💡 Hyper-V vs. Bare-Metal: The step-by-step instructions in this guide are virtually identical whether you are installing Windows Server 2025 on a virtualized hypervisor or directly onto physical bare-metal hardware. If you are using physical bare-metal machines, you can follow along with this guide exactly as written. For a personal learning lab, I suggest using Hyper-V (as it runs natively on Windows 11 Pro/Enterprise and makes tearing down/rebuilding simple), but physical bare-metal hardware works just as well. Knowing the setup process for both options is a valuable asset for real-world system administration.
The Architecture
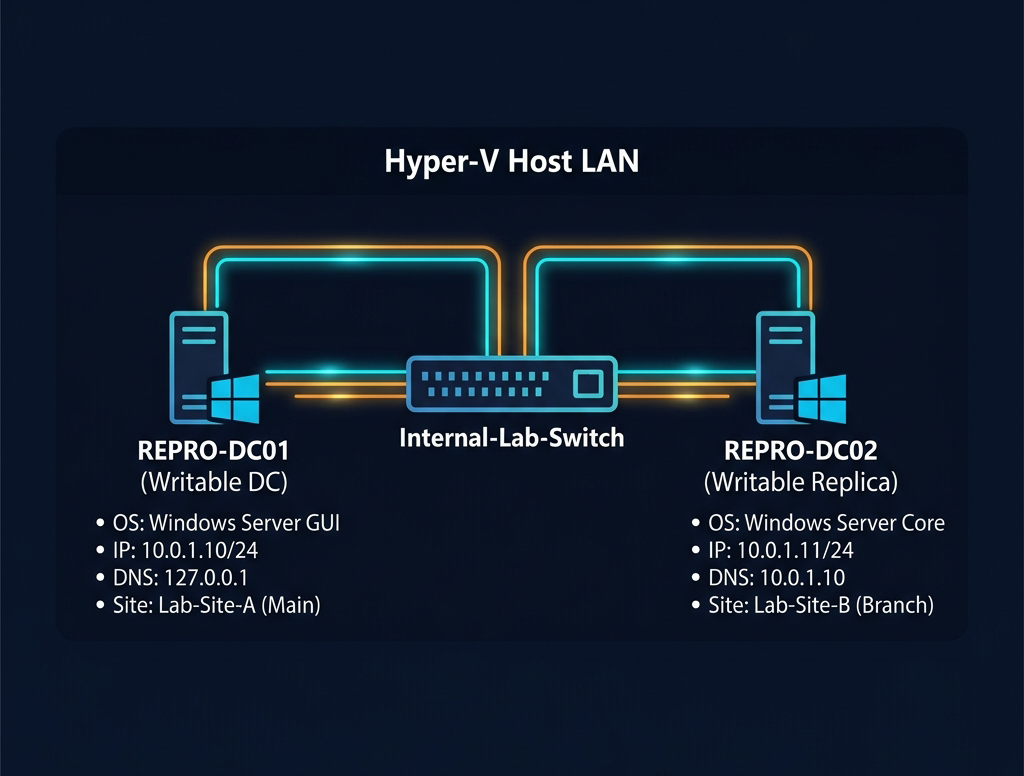
The lab uses a private internal network switch to prevent DHCP conflicts with the home network, routing all DNS queries through my primary Domain Controller:
                  +-----------------------------------------+
                  |            Hyper-V Host LAN             |
                  |                                         |
                  |   +---------------------------------+   |
                  |   |      Internal-Lab-Switch        |   |
                  |   +----------------+-----------+----+   |
                  |                    |           |        |
                  +--------------------|-----------|--------+
                                       |           |
               ┌───────────────────────┴─┐       ┌─┴───────────────────────┐
               │       REPRO-DC01        │       │       REPRO-DC02        │
               │      (Writable DC)      │       │   (Writable Replica)    │
               │                         │       │                         │
               │  • OS: Win Server GUI   │       │  • OS: Win Server Core  │
               │  • IP: 10.0.1.10/24     │       │  • IP: 10.0.1.11/24     │
               │  • DNS: 127.0.0.1       │       │  • DNS: 10.0.1.10       │
               │  • Site: Site-A (Main)  │       │  • Site: Site-B (Branch)│
               └─────────────────────────┘       └─────────────────────────┘
The Hardware: Windows 11 Hyper-V Host Workstation
While my core homelab runs on a dedicated headless Proxmox VE server, I decided to host this Microsoft study lab on my main Windows 11 workstation. This allows me to practice Hyper-V management, Failover Clustering, and nested virtualization directly on the native hypervisor software without nested virtualization abstractions.
🎓 Exam Alignment: Hyper-V and nested virtualization are core parts of the virtualization management domain of the AZ-802 exam. Microsoft expects hybrid administrators to configure virtual network adapters, virtual switches, nested hypervisors, and security profiles directly on Hyper-V hosts.
The physical host is a high-performance workstation equipped with:
- Processor: 12th Gen Intel Core i7-12700K (12 Cores / 20 Threads, running up to 5.0 GHz)
- Memory: 64 GB DDR5 RAM (giving me plenty of overhead to run active domain controllers and cluster nodes simultaneously)
- Storage: A 3TB secondary hard drive (dedicated for
D:\Hyper-vvirtual machine storage files; while not an SSD, it is more than fast enough for running these lab testing configurations)
To optimize resource usage on this setup, I leverage Hyper-V's Dynamic Memory (allowing idle guest VMs to scale down to as little as 512MB RAM) and Dynamically Expanding VHDX disks (keeping initial OS footprint under 10 GB per host).
Recommended VM Sizing & Settings
If you are building this lab yourself—whether using Hyper-V, VMware ESXi, Proxmox VE, or VirtualBox—here are the recommended VM specifications to ensure a smooth learning experience without resource exhaustion:
| VM Name | Role | OS Install Type | vCPU Cores | Recommended RAM | Min / Startup RAM | Disk Sizing (Dynamic) | Key Security Settings (Exam Focus) |
|---|---|---|---|---|---|---|---|
| REPRO-DC01 | Writable DC | Desktop Experience (GUI) | 2 | 4 GB | 2 GB | 60 GB VHDX | Gen 2 / UEFI, Secure Boot Enabled |
| REPRO-DC02 | Read-Only DC | Server Core (No GUI) | 1 | 2 GB | 1 GB | 40 GB VHDX | Gen 2 / UEFI, Secure Boot Enabled |
Standard vs. Datacenter: Which Edition to Choose?
A common question when setting up a Windows Server lab is whether to choose the Standard or Datacenter edition:
- For Basic Domain Services: Standard and Datacenter are functionally identical. Standard is fully capable of hosting Active Directory Domain Services, DNS, Group Policies, DHCP, and file shares.
- For the AZ-802 Exam & Advanced Labs (Recommended): I highly recommend selecting the Datacenter edition. The AZ-802 exam heavily tests enterprise-grade storage and virtualization technologies that are exclusive to Datacenter:
- Storage Spaces Direct (S2D): Standard does not support S2D, which is a core component of the exam's hyperconverged clustering objectives.
- Storage Replica: Standard is limited to replicating a single volume up to 2 TB. Datacenter supports unlimited volume sizes and counts.
- Software-Defined Networking (SDN): SDN fabric features and virtual network gateway routing are restricted to Datacenter.
- Shielded Virtual Machines: Advanced virtualization host guarding requires a Datacenter license.
Key Hypervisor Configuration Notes:
- Generation 2 VMs (UEFI): In Hyper-V, ensure you select Generation 2 (rather than Generation 1). For other hypervisors (like Proxmox or VMware), set the firmware to UEFI instead of legacy BIOS. Gen 2 is the modern enterprise standard and is heavily referenced in the Microsoft certification tracks for VM deployment and recovery objectives.
- Secure Boot: Ensure Secure Boot is enabled. For Windows Server 2022/2025, the default Microsoft template should be selected. The exam tests security compliance and host resource protection for hybrid workloads.
- Dynamic Memory / Memory Ballooning: If your hypervisor supports it, enable dynamic memory allocation. This allows idle Domain Controllers to release unused memory back to the host system, letting them scale down to as little as 512MB RAM. AZ-802 covers host resource management, memory sizing, and optimization.
- Virtual TPM (vTPM): While not strictly required to promote a DC, enabling virtual TPM on Gen 2 VMs is highly recommended for security objectives. A vTPM is required to practice BitLocker drive encryption and Shielded VMs, both of which are prominent topics in the hybrid security domains of the exam.
Lab Prerequisites: Getting the Windows Server 2025 ISO
Before creating your virtual machines in Hyper-V, you will need the installation media:
- Download: You can download the official Windows Server 2025 ISO directly from the Microsoft Evaluation Center.
- Evaluation Mode: The evaluation ISO is fully functional and free to use for 180 days, which is plenty of time to build, test, and tear down this lab.
- Licensing Note: If you want to convert the evaluation instance to a fully licensed version later, you can do so in PowerShell using the Deployment Image Servicing and Management (DISM) tool:
DISM /online /Set-Edition:ServerDatacenter /ProductKey:XXXXX-XXXXX-XXXXX-XXXXX-XXXXX /AcceptEula - Physical Bare-Metal Installation (Alternative): If you are deploying this lab on physical bare-metal hardware (like repurposed PCs, mini PCs, or servers) instead of virtual machines:
- Create a Bootable USB: Write the downloaded ISO to a USB flash drive using a tool like Rufus (ensuring the GPT partition scheme and UEFI target system are selected) or Ventoy.
- BIOS/UEFI Configuration: Boot into your hardware's motherboard BIOS and ensure UEFI Mode is enabled, Secure Boot is active, and TPM 2.0 (Intel PTT or AMD fTPM) is turned on to satisfy modern security requirements.
- Boot & Install: Press your motherboard's boot menu hotkey (typically F8, F11, or F12) during startup, select the USB drive in UEFI mode, and run the standard Windows Server installation wizard.
Step 1: Bootstrapping the Forest Root (REPRO-DC01)
Our first VM (REPRO-DC01) acts as the forest root. The bootstrapping commands should be run only after the base Windows Server operating system is fully installed and initially configured.
Phase 1: Base OS Installation & Initial Configuration
Before running any PowerShell commands to promote your domain controller, you must install the base OS and perform these initial system setup tasks:
- Windows Setup Walkthrough (Initial ISO Boot):
- Language & Region: Boot your VM (or physical machine) from the Windows Server 2025 ISO. Select your preferred language, time/currency format, and keyboard layout, then click Next.
- Setup Launch: In the modern Windows Server 2025 purple installation screen, check the box to confirm you want to proceed and click Next (or click Install Now if using the legacy setup layout).
- Product Key: Since you are deploying an evaluation lab environment, click "I don't have a product key" when prompted.
- Edition Selection: Select Windows Server 2025 Datacenter (Desktop Experience) for
REPRO-DC01to install the full graphical user interface (GUI). (ForREPRO-DC02in Step 2, you will select the standard Windows Server 2025 Datacenter option to deploy the lightweight Server Core edition). Click Next.⚠️ Gotcha: The Server Core edition is labeled simply as Windows Server 2025 Datacenter (without any suffix). There is no option explicitly named "Server Core" on the screen. The option with the graphical GUI is explicitly labeled as Desktop Experience. If you make a mistake here, you cannot convert between Core and GUI after the installation is complete without a full OS reinstall.
- License Agreement: Read and accept the Microsoft Software License Terms.
- Installation Type: Select Custom: Install Microsoft Server Operating System only (advanced). Do not choose the upgrade option.
- Disk Allocation: Select the unallocated space on your virtual disk (typically Drive 0) and click Next. The setup will automatically partition and format the disk, then begin copying installation files.
- Reboot: Once the installation finishes, the system will restart and boot into the Out-of-Box Experience (OOBE).
- Post-Install Configuration (OOBE):
- Local Administrator Password: Set a secure local Administrator password when prompted.
- Rename the Computer: Rename the host from the random default string (e.g.
WIN-XXXXXX) toREPRO-DC01(andREPRO-DC02for the second machine) and reboot. Hostnames must be set before promoting a machine to a Domain Controller. - Configure a Static IP: Active Directory requires a stable IP address. Set the IPv4 properties manually:
- IP Address:
10.0.1.10 - Subnet Mask:
255.255.255.0 - Default Gateway: Leave blank (for isolated lab switches) or point to your lab router's gateway.
- Preferred DNS Server:
127.0.0.1(the loopback address, as this machine will be hosting its own DNS server).
- IP Address:
Phase 2: Bootstrapping Active Directory via PowerShell
Once the base OS is named and configured with a static IP, log in as the local Administrator, open PowerShell as an Administrator, and run:
# 1. Install AD DS Feature and Management Consoles
Install-WindowsFeature AD-Domain-Services -IncludeManagementTools

# 2. Promote to Forest Root DC
Install-ADDSForest `
  -DomainName "lab.reprodev.local" `
  -DomainNetbiosName "LAB" `
  -ForestMode "WinThreshold" -DomainMode "WinThreshold" `
  -InstallDns -Force
🎓 Exam Alignment: The AZ-802 exam focuses heavily on modern deployment methods. While you can promote a Domain Controller via the Server Manager GUI, Microsoft heavily favors PowerShell cmdlets (like
Install-WindowsFeatureandInstall-ADDSForest) for deployment and automation objectives on the exam. Additionally, understanding the forest and domain functional levels (and how they affect feature availability) is a core exam topic.
Key parameters:
WinThreshold: Sets the functional level to Windows Server 2016/2019/2022/2025.InstallDns: Since AD DS relies on DNS SRV records to locate domain resources, we bind the DNS Server role locally.- Reboot: The machine will automatically restart. Log in as
LAB\Administratorto continue.
Step 2: Promoting a Secondary Replica (REPRO-DC02)
For redundancy (and to practice multi-site replication), I deploy a second VM (REPRO-DC02) running Windows Server Core. Server Core is the lightweight, command-line-only version of Windows Server. Just like with the first DC, you must install the base OS and perform initial configuration before promoting it.
🎓 Exam Alignment: The AZ-802 exam focuses heavily on Server Core deployment and administration. Microsoft expects hybrid administrators to minimize attack surfaces and host footprints by utilizing headless Server Core installations where possible, and using tools like
sconfigand PowerShell for initial configuration.
Phase 1: Base OS Installation & Initial Configuration (Server Core)
- Windows Setup Walkthrough:
- Language & Region: Boot the second VM from the Windows Server 2025 ISO. Select your language/region and click Next.
- Setup Launch: Click Next on the purple screen.
- Product Key: Click "I don't have a product key".
- Edition Selection: Select Windows Server 2025 Datacenter (do NOT select Desktop Experience). Click Next.
⚠️ Gotcha: Selecting the option with no suffix installs the command-line-only Server Core edition. The installer does not explicitly label this option as "Server Core"; it only labels the GUI version as "Desktop Experience".
- Install Customization: Accept EULA, select Custom: Install Microsoft Server Operating System only (advanced), select your virtual disk, and click Next. Let the installation complete and reboot.
- Server Core Command-Line Configuration:
- Administrator Password: On first boot, Server Core will present a text interface requiring you to set the Administrator password. Confirm the password and log in to the command prompt.
- Sconfig Utility: Type
sconfigat the command prompt and press Enter to launch the text-based Server Configuration tool.- Rename the Server: Select option 2 (Computer Name), type
REPRO-DC02, and press Enter. Reboot when prompted. - Static IP & DNS: After rebooting, log in, launch
sconfig, and select option 8 (Network Settings). Choose your network adapter and configure:- IP Address:
10.0.1.11 - Subnet Mask:
255.255.255.0 - Default Gateway: Leave blank (or your lab router).
- DNS Server: Point it directly to
10.0.1.10(the IP of the primary DC,REPRO-DC01). This is critical becauseREPRO-DC02must resolve thelab.reprodev.localSRV records to contact the forest root domain.
- IP Address:
- Rename the Server: Select option 2 (Computer Name), type
Phase 2: Promoting to a Writable Replica DC via PowerShell
Once configured and rebooted, log in to REPRO-DC02, launch PowerShell by typing powershell in the cmd window, and promote the secondary DC. Pointing its DNS client directly at the primary DC (10.0.1.10) is mandatory so it can locate and replicate from the forest root:
# On DC02 - Bind DNS to the Primary DC (using Get-NetAdapter to auto-detect the name)
Get-NetAdapter | Set-DnsClientServerAddress -ServerAddresses 10.0.1.10

# Install AD DS feature
Install-WindowsFeature AD-Domain-Services -IncludeManagementTools

# Promote to a Writable Replica DC
Install-ADDSDomainController `
  -DomainName "lab.reprodev.local" `
  -InstallDns -Force -Credential (Get-Credential LAB\Administrator)
🎓 Exam Alignment: Understanding the difference between
Install-ADDSForest(creating a new forest) andInstall-ADDSDomainController(adding a replica DC to an existing domain) is directly tested. Furthermore, the step of pointing the replica DC's DNS client to the primary DC is a critical troubleshooting scenario: if a promotion fails with "domain cannot be contacted," the root cause is almost always DNS misconfiguration.
⚠️ Troubleshooting: "An account with the same name exists in Active Directory" (DCPromo.General.54)
If you are tearing down and rebuilding your lab VMs, the replica promotion will fail if a computer object namedREPRO-DC02is still sitting in theDomain ControllersorComputersOU onREPRO-DC01from your previous run.
To resolve this, log intoREPRO-DC01, open Active Directory Users and Computers (dsa.msc), enable View -> Advanced Features, right-click the oldREPRO-DC02object, go to the Object tab, uncheck "Protect object from accidental deletion", and Delete the account. Then, re-run the promotion script onREPRO-DC02.
Once the promotion finishes and the server reboots, REPRO-DC02 acts as a writable replication partner and active secondary DNS resolver.
Step 3: Configuring Sites, Subnets & Replication
In an enterprise network, servers are distributed across multiple offices or regions. Active Directory uses Sites & Subnets to optimize replication traffic and ensure clients authenticate against the closest domain controller.
🎓 Exam Alignment: Managing AD DS replication, configuring site boundaries, and mapping subnets are core requirements under the hybrid identity planning and management domains of the AZ-802. You must be comfortable using replication cmdlets (such as
New-ADReplicationSiteandNew-ADReplicationSubnet) and checking replication state with command-line diagnostics.
I configure a two-site topology to represent a main office (Lab-Site-A) and a remote branch office (Lab-Site-B):
# 1. Rename the default site to match our main office Site-A
Get-ADReplicationSite -Identity "Default-First-Site-Name" | Rename-ADDirectoryServer -NewName "Lab-Site-A"

# 2. Create the second site for our branch office
New-ADReplicationSite -Name "Lab-Site-B"

# 3. Define the subnets and associate them to their respective sites
New-ADReplicationSubnet -Name "10.0.1.0/24" -Site "Lab-Site-A"
New-ADReplicationSubnet -Name "10.0.2.0/24" -Site "Lab-Site-B"

# 4. Logically move DC02 to our branch office site (Site-B)
Move-ADDirectoryServer -Identity "REPRO-DC02" -Site "Lab-Site-B"

# 5. Force an immediate replication sync across sites
repadmin /syncall /AeD
[!NOTE]
The Lab Sandbox Shortcut: In a production enterprise network,REPRO-DC02would physically reside on a separate routed VLAN (e.g.,10.0.2.11on the10.0.2.0/24subnet). To keep our host-level virtual network configurations simple without deploying nested software routers, we run both VMs on a single subnet (10.0.1.x). Logically moving theREPRO-DC02computer object toLab-Site-Bin Active Directory allows us to practice WAN-like replication and site scheduling within a simple, single-switch sandbox.
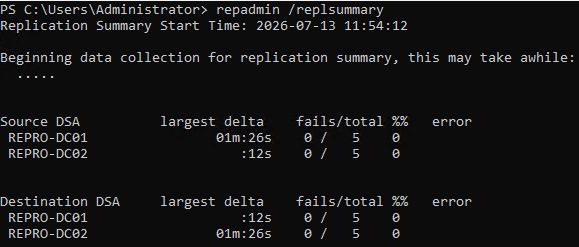
The repadmin /replsummary command checks that directory database synchronization between both nodes is executing successfully with zero replication errors.
🎓 Exam Alignment: The
repadmin /replsummaryandrepadmin /showreplcommand-line tools are the primary diagnostic tools for troubleshooting Active Directory replication. In the exam, you will be expected to analyze the outputs of these diagnostics to isolate sync issues, replication latency, blockages due to ports, or site link routing problems.
Step 4: Provisioning gMSAs & Group Policy Baselines
To complete my baseline on-premises configuration, I configure Group Policies (GPOs) and a Group Managed Service Account (gMSA). gMSAs are critical for modern Windows Server security because they automate password rotation without manual admin interaction.
🎓 Exam Alignment: Hybrid security and service account management are heavily weighted domains in the AZ-802. You are expected to know how to provision and configure Group Managed Service Accounts (gMSAs), including prerequisite steps like generating the Key Distribution Service (KDS) root key (
Add-KdsRootKey).
# 1. Create a Baseline GPO and Link to Domain Root
New-GPO -Name "LAB-Baseline-Security" | New-GPLink -Target "DC=lab,DC=reprodev,DC=local"

# 2. Deploy Key Distribution Service (KDS) Root Key (Forest-wide prerequisite)
Add-KdsRootKey -EffectiveTime ((Get-Date).AddHours(-10))

# 3. Create the gMSA
New-ADServiceAccount -Name "gmsa-svc01" -DNSHostName "gmsa-svc01.lab.reprodev.local" `
  -PrincipalsAllowedToRetrieveManagedPassword "Domain Controllers"
The Add-KdsRootKey is a one-time command that generates the root key used by domain controllers to calculate the gMSA passwords dynamically.
💡 Exam & Lab Tip: By default, a newly created Key Distribution Service (KDS) root key requires a 10-hour replication window before you can successfully provision and use a gMSA. To bypass this in our lab, we set the
-EffectiveTimeparameter to 10 hours in the past ((Get-Date).AddHours(-10)), allowing immediate service account provisioning. On the exam, remember that the KDS root key is a forest-wide prerequisite that must be deployed before any gMSA can be configured.
Verification Checklist
To confirm the forest health, run the following diagnostic suite:
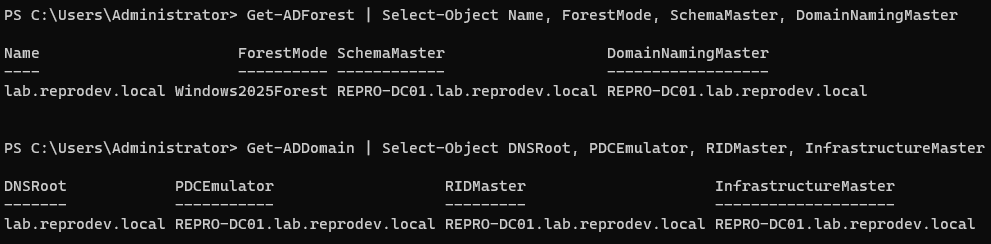
🎓 Exam Alignment: Diagnosing directory health and auditing Flexible Single Master Operations (FSMO) role placements are critical troubleshooting tasks covered under the active maintenance and diagnostics domain of the AZ-802. Microsoft expects you to know how to inspect role ownership using PowerShell (
Get-ADForest/Get-ADDomain) and verify replica integrity using commands likedcdiagandrepadmin.
- Active Directory Health Check:
Expected: All tests (Connectivity, Advertising, FSMO, Replications) pass successfully.dcdiag /v - Replication Partner Metadata:
Get-ADReplicationPartnerMetadata -Target "REPRO-DC01" | Select-Object Partner, LastReplicationSuccess - FSMO Role Audit:
Get-ADForest | Select-Object Name, ForestMode, SchemaMaster, DomainNamingMaster
Get-ADDomain | Select-Object DNSRoot, PDCEmulator, RIDMaster, InfrastructureMaster
⚠️ Troubleshooting: "Error (1908) Could not find the domain controller for this domain." (Exam Gotcha)
If you runrepadmin /replsummaryimmediately after promotingREPRO-DC02and see a1 / 5 failscount with error1908, do not panic. This is a common post-promotion transient state.
- The Root Cause: Active Directory replicates 5 default naming contexts (including DNS zone partitions). Right after a DC promotion, the DNS application directory partitions (
ForestDnsZones/DomainDnsZones) are still initializing and registering their GUID-based CNAME records. Because Kerberos authentication relies on these records to secure the replication channel, queries to those partitions fail with error 1908.- The Fix: Force an immediate synchronization of all naming contexts by running
repadmin /syncall /AeDonREPRO-DC01. Wait 2 minutes for DNS and Kerberos to settle, then runrepadmin /replsummaryagain. The failure count will drop to0.
💡 FSMO Role Classification (Exam Focus): The AZ-802 exam frequently tests your ability to distinguish between Forest-wide roles (Schema Master, Domain Naming Master) and Domain-wide roles (PDC Emulator, RID Master, Infrastructure Master). Active Directory only has one Schema Master and one Domain Naming Master per forest, but hosts one instance of each domain-wide role for each individual domain.
⚠️ FSMO Role Transfer vs. Seize (Disaster Recovery): If a Domain Controller holding FSMO roles fails, you must know how to recover role operations:
- Transfer: Used when both domain controllers are online and healthy. You cleanly shift the roles using PowerShell (
Move-ADDirectoryServerOperationMasterRole) or the MMC consoles.- Seize: Used only as a last resort when the role owner is permanently offline (e.g., catastrophic hardware failure). You force the takeover using the
-Forceparameter in PowerShell or theseizecommand insidentdsutil.- Critical Trap: Once you seize a master role (specifically Schema Master, Domain Naming Master, or RID Master), never boot the old domain controller back onto the network. Doing so will cause split-brain identity conflicts and database corruption. The old server must be wiped and re-promoted from scratch.
What This Gets You
- Enterprise Foundation: A fully functional multi-DC Active Directory forest with active DNS, replication, subnets, and group policy.
- Zero-Touch Ready: This lab matches the unattended installation scripts from the previous guide. You can tear down and rebuild the entire forest with a single bootstrapper run.
- Next-Lab Bridge: This on-premises environment serves as the direct foundation for Lab B (setting up Entra Connect Sync) and Lab C (onboarding
REPRO-DC01to Azure Arc). - Core SysAdmin Competency: Validates on-premises directory services experience, which is essential for advanced hybrid systems roles.
Don't forget to explore the rest of our website as we build out more content. Stay tuned for more tutorials, tips, and tricks to help you make tech work for you.
If you want to stay up-to-date with regular updates, make sure to subscribe to our free mailing list.