📖 AZ-802 Study Series: This is Part 2 of my hands-on lab series leading up to the Microsoft AZ-802 exam. Before automating, I suggest understanding the manual deployment process in Part 1: Building a Multi-DC Active Directory Forest, or check out The Ultimate Guide to Windows Server Hybrid Administrator Associate (AZ-802) Study Guide for the complete roadmap.
TL;DR - Smashed my head against manual Windows Server VM installation screens one too many times while building my AZ-802 (Configuring Windows Server Hybrid Advanced Services) study lab. Here is how I automated the entire boot and configuration pipeline for Generation 2 Hyper-V VMs so that I can spin up fresh, clean domain controllers with a single command.
Note: The Microsoft AZ-802 (Configuring Windows Server Hybrid Advanced Services) exam is currently in beta, with General Availability (GA) expected soon. Getting certified early is a strategic opportunity to get ahead and validate hybrid identity and infrastructure capabilities before the certification goes mainstream.
Why Automate Your AZ-802 Hybrid Lab?
In Part 1: Building a Multi-DC Active Directory Forest, we laid the directory foundation by manually promoting our forest root and replica controllers.
But manually installing those virtual machines from scratch is a massive time sink. Clicking through the OS installer, selecting keyboard layouts, formatting disks, setting passwords, and enabling WinRM over and over is tedious. More importantly, in modern systems engineering, manual repetition is a bug.
If you are learning to manage hybrid cloud workloads, your infrastructure should be treated as code from day one. In this post (Part 2), we show how to automate the entire Generation 2 Hyper-V VM boot and configuration pipeline so you can spin up fresh nodes with a single command. I wanted a way to:
- Spin up a brand new VM.
- Inject my local administrative credentials, language settings, and WinRM configurations automatically.
- Boot the VM and have it land on a fully initialized Windows Server Desktop, ready for Azure Arc onboarding, without clicking a single button.
⚠️ Important Architecture Note: This guide focuses on automating the deployment of
REPRO-DC01(the forest root). To complete the multi-DC forest replication and site setup described in the series, you will need to run the replica promotion automation guide in Part 3: Automating Replica Domain Controller Promotion after DC01 is live.
🎓 Exam Alignment (Windows Server Deployments & Hyper-V Management):
Deploying Windows Server using automated and unattended methods is a core concept tested in the AZ-802: Configuring Windows Server Hybrid Advanced Services exam under the "Deploy and Manage Active Directory Domain Services" and "Deploy and Manage Hyper-V Virtual Machines" domains. You are expected to understand:
- Configuration Passes: The sequence and role of WinPE configuration passes (like
windowsPE,specialize, andoobeSystem) inautounattend.xml.- Hyper-V VM Settings: Programmatic creation of Generation 2 virtual machines, virtual TPM enablement, and boot priority ordering.
- Automated Bootstrapping: Bypassing interactive Windows Setup pages using answer files to standardize deployments.
What You'll Learn in This Post
- Zero-Touch VM Bootstrapping: A complete script to build unattend disks, inject custom answer files, and start VMs.
- Windows PE Image Indexes: How to target specific operating system versions (Desktop Experience vs. Server Core).
- Hyper-V Gen 2 UEFI Pitfalls: Navigating boot order priority, missing DVD controllers, and the "Press any key to boot..." prompt.
- BOM File Encoding Gotchas: Why standard PowerShell exports fail and how to write clean, BOM-free XML files.
AZ-802 Automated Unattended VM Installation Guide
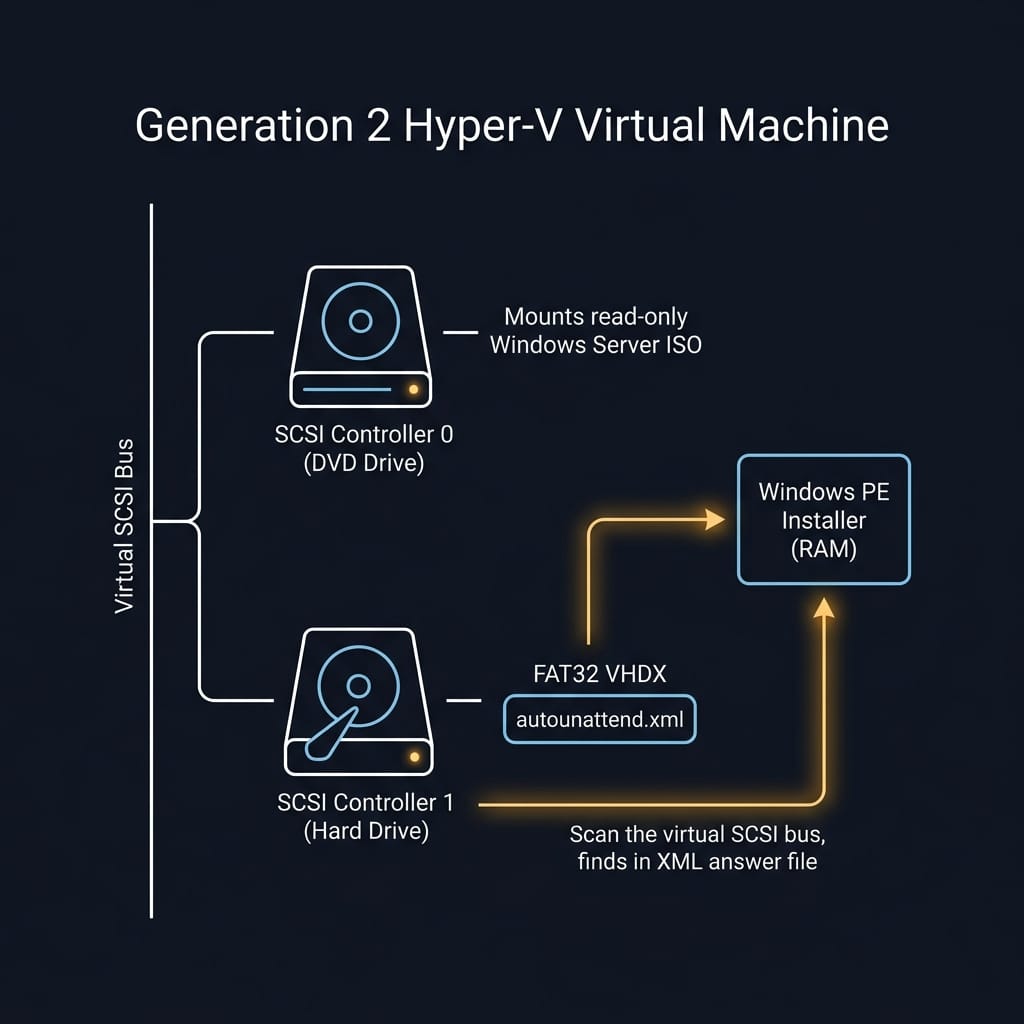
The Method: Since Generation 2 VMs do not support legacy floppy drives, we mount a tiny 64MB FAT32 VHDX containing the
autounattend.xmlfile. According to the official Microsoft Windows Answer Files documentation, the Windows PE engine automatically scans all attached storage drives at boot, detects the XML file, and installs the OS on the main 50GB disk automatically.
Prerequisites: Obtaining the Windows Server 2025 ISO
Before running the automation script, you need a local Windows Server 2025 ISO. You can download the installation media through these official channels:
- Microsoft Evaluation Center: Microsoft provides a free 180-day evaluation ISO for Windows Server 2025. This is the easiest path for homelab testing and exam prep.
- Visual Studio Subscriptions: If you have an active Visual Studio/MSDN subscription, you can download retail and volume licensing ISOs from the subscriber downloads portal. - (If your company is a Microsoft Gold Partner then you'll be able to grab this from there with a full licensed version)
- Volume Licensing Service Center (VLSC): For enterprise environments, the official ISO is available through corporate licensing agreements.
Step-by-Step Automation Script
Run this script from an Administrator PowerShell console on your host Windows 11 machine. It will automatically build the configuration disk, write the answer file, attach it to REPRO-DC01, and start the VM.
This can also be found on my GitHub but kept here as part of the overall course material with the extra contenxt for Exam Prep.
# HYPER-V VM REBUILD & UNATTENDED BOOTSTRAPPER FOR REPRO-DC01
# Run this from an Administrator PowerShell console.
# 1. Configuration Variables
$VMName = "REPRO-DC01"
$VMRoot = "D:\Hyper-V"
$VMPath = Join-Path $VMRoot $VMName
$UnattendIsoPath = Join-Path $VMPath "${VMName}-unattend.iso"
$AdminPassword = "P@ssword123!" # Change to your preferred administrator password
$IsoPath = "C:\path\to\WindowsServer2025.iso" # Replace with the path to your Windows Server 2025 ISO
# Stop and remove existing VM if it exists to start completely fresh
if (Get-VM -Name $VMName -ErrorAction SilentlyContinue) {
Write-Host "VM '$VMName' already exists. Cleaning up and deleting it..." -ForegroundColor Yellow
Stop-VM -Name $VMName -Force -ErrorAction SilentlyContinue
Remove-VM -Name $VMName -Force
}
# Remove existing unattend.iso if it exists to avoid locks
$oldIso = Join-Path $VMPath "${VMName}-unattend.iso"
if (Test-Path $oldIso) {
Write-Host "Removing existing unattend ISO..." -ForegroundColor Yellow
Remove-Item -Path $oldIso -Force -ErrorAction SilentlyContinue
}
# Delete the existing VM folder if it exists to clear out old VHDX files and avoid New-VM conflicts
if (Test-Path $VMPath) {
Write-Host "Old VM folder found at $VMPath. Deleting files to avoid VHDX creation conflicts..." -ForegroundColor Yellow
# Give the hypervisor a second to release locks
Start-Sleep -Seconds 1
Remove-Item -Path $VMPath -Recurse -Force -ErrorAction SilentlyContinue
}
# 2. Pre-create the directory structure
Write-Host "Creating VM directory structure at: $VMPath..." -ForegroundColor Green
New-Item -ItemType Directory -Path $VMPath -Force
New-Item -ItemType Directory -Path (Join-Path $VMPath "Virtual Hard Disks") -Force
# 2.5 Ensure the Internal NAT Switch and Host Routing are Configured
Write-Host "Configuring Host NAT Network for 'Internal-Lab-Switch'..." -ForegroundColor Green
$switchName = "Internal-Lab-Switch"
$gatewayIP = "10.0.1.1"
# Create switch if missing
if (-not (Get-VMSwitch -Name $switchName -ErrorAction SilentlyContinue)) {
Write-Host "Creating Virtual Switch '$switchName'..." -ForegroundColor Yellow
New-VMSwitch -Name $switchName -SwitchType Internal -ErrorAction Stop
}
# Configure IP on the Host Virtual Interface
$hostInterfaceAlias = "vEthernet ($switchName)"
$existingIP = Get-NetIPAddress -InterfaceAlias $hostInterfaceAlias -IPAddress $gatewayIP -ErrorAction SilentlyContinue
if (-not $existingIP) {
Write-Host "Assigning Gateway IP $gatewayIP to host interface '$hostInterfaceAlias'..." -ForegroundColor Yellow
Remove-NetIPAddress -InterfaceAlias $hostInterfaceAlias -Confirm:$false -ErrorAction SilentlyContinue
New-NetIPAddress -InterfaceAlias $hostInterfaceAlias -IPAddress $gatewayIP -PrefixLength 24 -ErrorAction Stop
}
# Create NAT Translation rule if missing
$existingNat = Get-NetNat | Where-Object {$_.InternalIPInterfaceAddressPrefix -eq "10.0.1.0/24"}
if (-not $existingNat) {
Write-Host "Creating host NAT translation rule (LabNatNetwork)..." -ForegroundColor Yellow
Get-NetNat -Name "LabNatNetwork" -ErrorAction SilentlyContinue | Remove-NetNat -Confirm:$false
New-NetNat -Name "LabNatNetwork" -InternalIPInterfaceAddressPrefix "10.0.1.0/24" -ErrorAction Stop
}
# 3. Create the VM in its dedicated path
Write-Host "Creating Generation 2 VM '$VMName'..." -ForegroundColor Green
New-VM -Name $VMName `
-Generation 2 `
-MemoryStartupBytes 2048MB `
-Path $VMPath `
-NewVHDPath (Join-Path $VMPath "Virtual Hard Disks\${VMName}.vhdx") `
-NewVHDSizeBytes 50GB `
-SwitchName "Internal-Lab-Switch"
# 4. Configure Best Practice VM Settings
Write-Host "Configuring processor count, dynamic memory limits, and integration guest services..." -ForegroundColor Green
Set-VM -Name $VMName -ProcessorCount 2 -DynamicMemory -MemoryMinimumBytes 1024MB -MemoryMaximumBytes 4096MB -AutomaticCheckpointsEnabled $false
Enable-VMIntegrationService -VMName $VMName -Name "Guest Service Interface"
# Configure Secure Boot
Set-VMFirmware -VMName $VMName -EnableSecureBoot On
# Configure virtual TPM (Required for Windows Server 2025 security baselines)
Write-Host "Provisioning Key Protector and enabling virtual TPM..." -ForegroundColor Green
Set-VMKeyProtector -VMName $VMName -NewLocalKeyProtector
Enable-VMTPM -VMName $VMName
# 5. Create the unattended installation ISO folder structure
$TempDir = Join-Path $VMPath "TempUnattend"
if (Test-Path $TempDir) {
Remove-Item -Path $TempDir -Recurse -Force -ErrorAction SilentlyContinue
}
New-Item -ItemType Directory -Path $TempDir -Force | Out-Null
# Define IMAPI2 ISO generation helper if not already loaded in session
if (-not ([System.Type]::GetType("IsoHelper.FileUtil"))) {
$code = @"
using System;
using System.IO;
using System.Runtime.InteropServices;
using System.Runtime.InteropServices.ComTypes;
namespace IsoHelper {
public static class FileUtil {
public static void WriteIStreamToFile(object i, string fileName) {
IStream inputStream = i as IStream;
using (FileStream outputFileStream = File.OpenWrite(fileName)) {
byte[] buffer = new byte[2048];
int bytesRead = 0;
IntPtr pcbRead = Marshal.AllocCoTaskMem(sizeof(int));
try {
do {
inputStream.Read(buffer, buffer.Length, pcbRead);
bytesRead = Marshal.ReadInt32(pcbRead);
if (bytesRead > 0) {
outputFileStream.Write(buffer, 0, bytesRead);
}
} while (bytesRead > 0);
} finally {
Marshal.FreeCoTaskMem(pcbRead);
}
outputFileStream.Flush();
}
}
}
}
"@
Add-Type -TypeDefinition $code
}
# 6. Write the autounattend.xml content (Desktop Experience / GUI configuration)
$xmlPath = Join-Path $TempDir "autounattend.xml"
$xmlContent = @"
<?xml version="1.0" encoding="utf-8"?>
<unattend xmlns="urn:schemas-microsoft-com:unattend">
<settings pass="windowsPE">
<component name="Microsoft-Windows-International-Core-WinPE" processorArchitecture="amd64" publicKeyToken="31bf3856ad364e35" language="neutral" versionScope="nonSxS" xmlns:wcm="http://schemas.microsoft.com/WCM/2002/XML">
<InputLocale>en-US</InputLocale>
<SystemLocale>en-US</SystemLocale>
<UILanguage>en-US</UILanguage>
<UserLocale>en-US</UserLocale>
<SetupUILanguage>
<UILanguage>en-US</UILanguage>
<WillShowUI>Never</WillShowUI>
</SetupUILanguage>
</component>
<component name="Microsoft-Windows-Setup" processorArchitecture="amd64" publicKeyToken="31bf3856ad364e35" language="neutral" versionScope="nonSxS" xmlns:wcm="http://schemas.microsoft.com/WCM/2002/XML">
<DiskConfiguration>
<Disk wcm:action="add">
<CreatePartitions>
<!-- EFI System Partition -->
<CreatePartition wcm:action="add">
<Order>1</Order>
<Type>EFI</Type>
<Size>100</Size>
</CreatePartition>
<!-- MSR Partition -->
<CreatePartition wcm:action="add">
<Order>2</Order>
<Type>MSR</Type>
<Size>128</Size>
</CreatePartition>
<!-- Windows Partition -->
<CreatePartition wcm:action="add">
<Order>3</Order>
<Type>Primary</Type>
<Extend>true</Extend>
</CreatePartition>
</CreatePartitions>
<ModifyPartitions>
<ModifyPartition wcm:action="add">
<Order>1</Order>
<PartitionID>1</PartitionID>
<Format>FAT32</Format>
<Label>System</Label>
</ModifyPartition>
<ModifyPartition wcm:action="add">
<Order>2</Order>
<PartitionID>3</PartitionID>
<Format>NTFS</Format>
<Label>Windows</Label>
</ModifyPartition>
</ModifyPartitions>
<DiskID>0</DiskID>
<WillWipeDisk>true</WillWipeDisk>
</Disk>
<WillShowUI>OnError</WillShowUI>
</DiskConfiguration>
<ImageInstall>
<OSImage>
<InstallTo>
<DiskID>0</DiskID>
<PartitionID>3</PartitionID>
</InstallTo>
<InstallFrom>
<MetaData wcm:action="add">
<Key>/IMAGE/INDEX</Key>
<!-- Index 4 selects Windows Server Datacenter (Desktop Experience) Evaluation -->
<Value>4</Value>
</MetaData>
</InstallFrom>
</OSImage>
<WillShowUI>OnError</WillShowUI>
</ImageInstall>
<UserData>
<AcceptEula>true</AcceptEula>
<FullName>Reprodev Lab</FullName>
<Organization>Reprodev</Organization>
</UserData>
</component>
</settings>
<settings pass="specialize">
<component name="Microsoft-Windows-Shell-Setup" processorArchitecture="amd64" publicKeyToken="31bf3856ad364e35" language="neutral" versionScope="nonSxS" xmlns:wcm="http://schemas.microsoft.com/WCM/2002/XML">
<ComputerName>$VMName</ComputerName>
<TimeZone>GMT Standard Time</TimeZone>
</component>
<component name="Microsoft-Windows-Deployment" processorArchitecture="amd64" publicKeyToken="31bf3856ad364e35" language="neutral" versionScope="nonSxS" xmlns:wcm="http://schemas.microsoft.com/WCM/2002/XML">
<RunSynchronous>
<RunSynchronousCommand wcm:action="add">
<Order>1</Order>
<Path>reg add "HKLM\SOFTWARE\Policies\Microsoft\Windows\OOBE" /v DisablePrivacyExperience /t REG_DWORD /d 1 /f</Path>
<Description>Disable Privacy Settings Experience</Description>
</RunSynchronousCommand>
</RunSynchronous>
</component>
</settings>
<settings pass="oobeSystem">
<component name="Microsoft-Windows-International-Core" processorArchitecture="amd64" publicKeyToken="31bf3856ad364e35" language="neutral" versionScope="nonSxS" xmlns:wcm="http://schemas.microsoft.com/WCM/2002/XML">
<InputLocale>en-GB</InputLocale>
<SystemLocale>en-GB</SystemLocale>
<UILanguage>en-US</UILanguage>
<UserLocale>en-GB</UserLocale>
</component>
<component name="Microsoft-Windows-Shell-Setup" processorArchitecture="amd64" publicKeyToken="31bf3856ad364e35" language="neutral" versionScope="nonSxS" xmlns:wcm="http://schemas.microsoft.com/WCM/2002/XML">
<AutoLogon>
<Password>
<Value>$AdminPassword</Value>
<PlainText>true</PlainText>
</Password>
<Enabled>true</Enabled>
<LogonCount>1</LogonCount>
<Username>Administrator</Username>
</AutoLogon>
<UserAccounts>
<AdministratorPassword>
<Value>$AdminPassword</Value>
<PlainText>true</PlainText>
</AdministratorPassword>
</UserAccounts>
<FirstLogonCommands>
<SynchronousCommand wcm:action="add">
<Order>1</Order>
<!-- Search all drive letters for the UNATTEND volume label and run bootstrap.ps1, logging output to C:\bootstrap.log -->
<CommandLine>powershell -Command "`$drive = (Get-Volume -FileSystemLabel 'UNATTEND' -ErrorAction SilentlyContinue).DriveLetter; if (`$drive) { powershell -ExecutionPolicy Bypass -File \"`${drive}:\bootstrap.ps1\" > C:\bootstrap.log 2>&1 }"</CommandLine>
<Description>Run Post-Install Bootstrap Script</Description>
</SynchronousCommand>
</FirstLogonCommands>
</component>
</settings>
</unattend>
"@
# IMPORTANT: Do NOT use Out-File -Encoding utf8 here.
# PowerShell 5.1's utf8 encoding adds a BOM (Byte Order Mark) which causes
# Windows Setup's WinPE XML parser to silently skip the autounattend.xml file.
$utf8NoBom = [System.Text.UTF8Encoding]::new($false)
[System.IO.File]::WriteAllText($xmlPath, $xmlContent, $utf8NoBom)
# 8. Write the post-install bootstrap script containing network configuration and AD DS promotion
$bootstrapPath = Join-Path $TempDir "bootstrap.ps1"
$bootstrapContent = @"
# ==============================================================================
# POST-INSTALL BOOTSTRAP SCRIPT FOR REPRO-DC01
# Runs automatically on first logon to configure networking and AD DS Forest
# ==============================================================================
Write-Host "Enabling WinRM and setting network profile to Private..." -ForegroundColor Green
Enable-PSRemoting -Force
Set-NetConnectionProfile -NetworkCategory Private
Write-Host "Configuring Static IP (10.0.1.10), Gateway (10.0.1.1), and DNS..." -ForegroundColor Green
`$adapter = Get-NetAdapter | Select-Object -First 1
if (`$adapter) {
Set-NetIPInterface -InterfaceIndex `$adapter.InterfaceIndex -DHCP Disabled -ErrorAction SilentlyContinue
Remove-NetIPAddress -InterfaceIndex `$adapter.InterfaceIndex -Confirm:`$false -ErrorAction SilentlyContinue
Remove-NetRoute -InterfaceIndex `$adapter.InterfaceIndex -Confirm:`$false -ErrorAction SilentlyContinue
New-NetIPAddress -InterfaceIndex `$adapter.InterfaceIndex -IPAddress 10.0.1.10 -PrefixLength 24 -DefaultGateway 10.0.1.1 -ErrorAction SilentlyContinue
Set-DnsClientServerAddress -InterfaceIndex `$adapter.InterfaceIndex -ServerAddresses "127.0.0.1","1.1.1.1" -ErrorAction SilentlyContinue
}
Write-Host "Installing Active Directory Domain Services role..." -ForegroundColor Green
Install-WindowsFeature AD-Domain-Services -IncludeManagementTools
Write-Host "Configuring post-promotion AutoLogon for LAB\Administrator..." -ForegroundColor Green
`$winlogonPath = "HKLM:\SOFTWARE\Microsoft\Windows NT\CurrentVersion\Winlogon"
Set-ItemProperty -Path `$winlogonPath -Name "AutoAdminLogon" -Value "1" -Force -ErrorAction SilentlyContinue
Set-ItemProperty -Path `$winlogonPath -Name "DefaultUserName" -Value "Administrator" -Force -ErrorAction SilentlyContinue
Set-ItemProperty -Path `$winlogonPath -Name "DefaultPassword" -Value "P@ssword123!" -Force -ErrorAction SilentlyContinue
Set-ItemProperty -Path `$winlogonPath -Name "DefaultDomainName" -Value "LAB" -Force -ErrorAction SilentlyContinue
Write-Host "Promoting to Active Directory Forest Root (lab.reprodev.local)..." -ForegroundColor Green
`$dsrmPassword = ConvertTo-SecureString "P@ssword123!" -AsPlainText -Force
Install-ADDSForest ``
-DomainName "lab.reprodev.local" ``
-DomainNetbiosName "LAB" ``
-SafeModeAdministratorPassword `$dsrmPassword ``
-InstallDns -Force
"@
[System.IO.File]::WriteAllText($bootstrapPath, $bootstrapContent, $utf8NoBom)
# Verify the XML was written correctly before compiling the ISO
Write-Host "Verifying autounattend.xml..." -ForegroundColor Cyan
if (Test-Path $xmlPath) {
$bytes = [System.IO.File]::ReadAllBytes($xmlPath)
$hasBOM = ($bytes[0] -eq 0xEF -and $bytes[1] -eq 0xBB -and $bytes[2] -eq 0xBF)
$firstBytes = ($bytes[0..2] | ForEach-Object { "0x$($_.ToString('X2'))" }) -join " "
Write-Host " File exists : YES ($($bytes.Length) bytes)" -ForegroundColor Green
Write-Host " First bytes : $firstBytes" -ForegroundColor Cyan
if ($hasBOM) {
Write-Error " BOM DETECTED - autounattend.xml will be IGNORED by Windows Setup. Script aborted."
exit
} else {
Write-Host " BOM check : PASS (no BOM - Windows Setup will read this file)" -ForegroundColor Green
}
} else {
Write-Error "autounattend.xml was NOT written to $xmlPath. Script aborted."
exit
}
# 9. Compile the ISO using Windows IMAPI2 COM objects
Write-Host "Compiling unattend.iso using Windows IMAPI2..." -ForegroundColor Green
$fsi = New-Object -ComObject IMAPI2FS.MsftFileSystemImage
$fsi.FileSystemsToCreate = 7 # ISO9660, Joliet, UDF
$fsi.VolumeName = "UNATTEND"
$fsi.Root.AddTree($TempDir, $false)
$resultImage = $fsi.CreateResultImage()
[IsoHelper.FileUtil]::WriteIStreamToFile($resultImage.ImageStream, $UnattendIsoPath)
# Clean up temp folder
Remove-Item -Path $TempDir -Recurse -Force -ErrorAction SilentlyContinue
# 10. Re-create virtual DVD drives and mount both ISOs (to present autounattend.xml as removable media)
Write-Host "Re-creating virtual DVD drives and mounting ISOs..." -ForegroundColor Green
Get-VMDvdDrive -VMName $VMName | Remove-VMDvdDrive
$installDvd = Add-VMDvdDrive -VMName $VMName -Path $IsoPath -Passthru
$unattendDvd = Add-VMDvdDrive -VMName $VMName -Path $UnattendIsoPath -Passthru
# 11. Set UEFI boot order: boot from OS Install ISO DVD, then HDD
Write-Host "Setting UEFI boot order: DVD -> HDD..." -ForegroundColor Green
$hdd = Get-VMHardDiskDrive -VMName $VMName
Set-VMFirmware -VMName $VMName -BootOrder $installDvd, $hdd
# 13. Start the VM and automatically inject the boot keypress via Hyper-V WMI
Write-Host "Starting VM '$VMName'..." -ForegroundColor Green
Start-VM -Name $VMName
# Allow UEFI firmware to initialise before the bootloader takes over
Start-Sleep -Seconds 1
Write-Host "Injecting boot keypress via Hyper-V WMI keyboard API..." -ForegroundColor Cyan
$vmWmi = Get-WmiObject -Namespace "root\virtualization\v2" -Class "Msvm_ComputerSystem" |
Where-Object { $_.ElementName -eq $VMName }
$keyboard = $vmWmi.GetRelated("Msvm_Keyboard") | Select-Object -First 1
# Hammer Spacebar (VK 32) and Enter (VK 13) for 25 seconds to cover both UEFI boot prompt and Boot Manager selection
$pressEndTime = (Get-Date).AddSeconds(25)
while ((Get-Date) -lt $pressEndTime) {
[void]$keyboard.PressKey(32) # Spacebar
Start-Sleep -Milliseconds 100
[void]$keyboard.ReleaseKey(32)
Start-Sleep -Milliseconds 100
[void]$keyboard.PressKey(13) # Enter
Start-Sleep -Milliseconds 100
[void]$keyboard.ReleaseKey(13)
Start-Sleep -Milliseconds 100
}
Write-Host "Boot prompt window passed. Windows Setup is loading..." -ForegroundColor Green
Write-Host "The unattended installation will now proceed fully automatically." -ForegroundColor Yellow
Write-Host "Expected time to completion: 10-20 minutes. You can monitor progress in the VM Connection window." -ForegroundColor Cyan
---

## Target Operating System Selections (Image Indexes)

Depending on whether you want a GUI or a command-line interface, change the `<Value>` key in the `/IMAGE/INDEX` XML node of the script (Step 5):

* **Index 1:** Windows Server Standard (Server Core)
* **Index 2:** Windows Server Standard (Desktop Experience)
* **Index 3:** Windows Server Datacenter (Server Core) *(Recommended for REPRO-DC02)*
* **Index 4:** Windows Server Datacenter (Desktop Experience) *(Recommended for REPRO-DC01)*

> 🎓 **Exam Alignment (Hyper-V Security & Guest Services):**
> The AZ-802 exam frequently tests your understanding of virtual machine hardware configuration and security parameters:
> *   **Virtual TPM (vTPM):** To enable BitLocker inside a VM or prep it for Shielded VM configurations, you must configure a Key Protector (`Set-VMKeyProtector`) and enable vTPM (`Enable-VMTPM`).
> *   **Integration Services:** You must know which services are disabled by default (like *Guest Service Interface*, which is required for copying files between host and guest without network connectivity) and how to enable them programmatically (`Enable-VMIntegrationService`).
> *   **Generation 2 Features:** Secure Boot (`Set-VMFirmware -EnableSecureBoot On`) is a requirement for modern, secure OS deployments and is only supported on Generation 2 VMs.

---

## Troubleshooting UEFI Boot Failures

If your VM boots into a black screen showing `Start PXE over IPv4` or displays the `Microsoft Hyper-V UEFI Virtual Machine Boot Summary` with `No operating system was loaded`, it is due to one of the following two reasons:

### 1. Boot Order Priority (DVD is not first)
By default, Hyper-V places the Network Adapter (PXE) and Hard Drive ahead of the DVD drive in the boot order. Run this PowerShell command (as Administrator) on your host to force the VM to boot from the DVD drive first:
```powershell
$dvd = Get-VMDvdDrive -VMName "REPRO-DC01"
$hdd = Get-VMHardDiskDrive -VMName "REPRO-DC01" | Where-Object {$_.Path -notlike "*-unattend.vhdx"}
Set-VMFirmware -VMName "REPRO-DC01" -BootOrder $dvd, $hdd
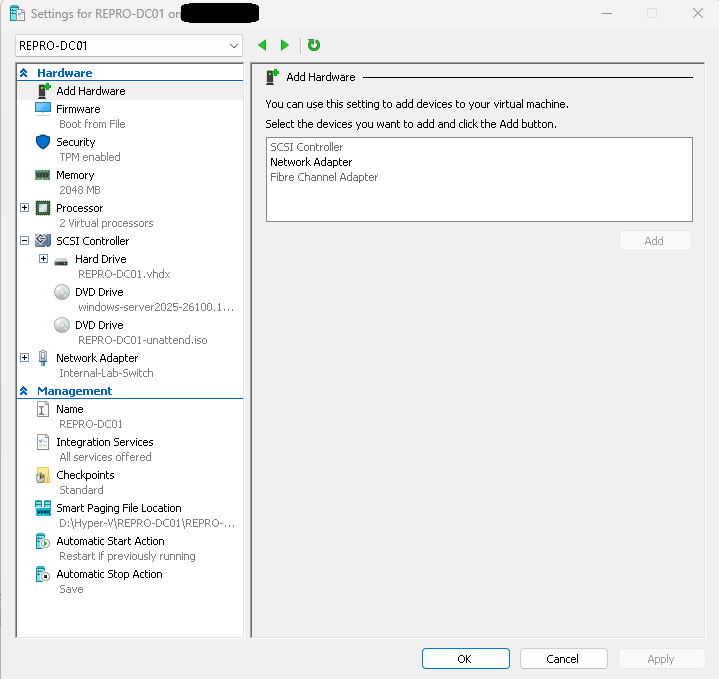
2. No DVD Drive Attached (VM Settings Shows Empty)
If you open the VM settings and there is no DVD drive listed under the IDE or SCSI controller, it means Set-VMDvdDrive ran against a VM that had no DVD controller - it silently does nothing in this case. Run the following to add and mount the drive from scratch:
$VMName = "REPRO-DC01"
$IsoPath = "C:\path\to\WindowsServer2025.iso"
Add-VMDvdDrive -VMName $VMName -Path $IsoPath
Then re-run the boot order fix from section 1 above to ensure the DVD is first.
3. ISO Boot Keypress Timeout
Windows setup ISOs display a prompt saying Press any key to boot from CD or DVD... for only 2 to 3 seconds. If you do not click inside the VM window and press a key quickly enough, the bootloader times out and skips the DVD.
- To fix:
- Open the VM Connection window.
- Click the grey [Restart now] button on the UEFI summary screen (or select Action ➔ Reset from the top menu).
- Immediately click inside the black VM screen to focus your keyboard cursor.
- Press the Spacebar or Enter key repeatedly until you see the Windows Setup loading screen.
4. Setup Wizard Appeared Instead of Unattended Install (autounattend.xml Not Detected)
If Windows Server Setup loads the "Select language settings" screen rather than proceeding automatically, the autounattend.xml was skipped by WinPE. This is caused by a UTF-8 BOM (Byte Order Mark) in the XML file - PowerShell 5.1's Out-File -Encoding utf8 silently adds a BOM that WinPE's XML parser rejects.
The fixed script uses [System.IO.File]::WriteAllText() with an explicit no-BOM encoder to prevent this. Choose one of the two recovery paths below:
Option A - Proceed Manually (Quickest Path, Windows Installed Today)
Use this if you just need a working DC01 and do not need to practice the unattended flow right now.
- In the Setup wizard, click Next on the language/locale screen.
- Click Install now.
- On the OS selection screen, choose Windows Server 2025 Datacenter (Desktop Experience) - this is Index 4.
- Accept the license agreement and click Next.
- Choose Custom: Install Windows only (advanced).
- Select Drive 0 Unallocated Space and click Next - Setup will partition and install automatically.
- When prompted after reboot, set the Administrator password to
P@ssword123!(or your preferred password). - After login, proceed to Post-Installation Cleanup below to remove the unattend VHDX.
Option B - Reset and Re-Run the Fixed Script (Recommended for AZ-802 Practice)
Use this to validate the fully automated unattended installation flow, which is the correct exam-representative path.
Step 1: Stop and clean up the current VM state
$VMName = "REPRO-DC01"

# Force power off the VM
Stop-VM -Name $VMName -TurnOff -Force

# Detach the virtual DVD drives (removing the ISO mounts)
Get-VMDvdDrive -VMName $VMName | Remove-VMDvdDrive

# Delete the old unattend ISO from disk
$UnattendIsoPath = "D:\Hyper-V\$VMName\$VMName-unattend.iso"
if (Test-Path $UnattendIsoPath) { Remove-Item -Path $UnattendIsoPath -Force }
Step 2: Re-run the updated bootstrapper script
Run the full script from the top of this document again. The updated version:
- Writes
autounattend.xmlandbootstrap.ps1without BOM using[System.IO.File]::WriteAllText() - Compiles the files into a custom
unattend.isovia Windows IMAPI2 COM objects. - Configures host-level NAT networks and gateway routing on the Hyper-V switch automatically.
- Mounts both the installation ISO and the unattend ISO as dual virtual DVD drives.
- Automatically sets the UEFI boot order (DVD -> HDD) via
Set-VMFirmware
Step 3: Start the VM
Start-VM -Name "REPRO-DC01"
Open the VM Connection window. Windows Setup should now proceed fully automatically - no keypress, no wizard, no prompts. The OS will install, reboot, auto-configure its static network, install AD DS, and promote itself to the forest root.
[!NOTE]
The automated OS installation, network configuration, and forest promotion process takes approximately 20 minutes in total. The VM will perform the initial OS install, automatically log in as the local administrator to trigger the bootstrap configurations, promote the AD DS forest root, and then execute a final reboot.When you return to the VM console after this final reboot, the auto-logon sequence will be complete and you will be presented with the domain controller logon screen. You must log in manually to access the desktop, but it will now be as the Domain Administrator account (
LAB\Administrator).
- Username:
LAB\Administrator(orAdministrator)- Default Password:
P@ssword123!(defined by the$AdminPasswordvariable in the script)
Post-Installation Cleanup
Once the automated installation completes and you log into the Windows Desktop for the first time:
- Shut down the VM.
- Open PowerShell as Admin on the host and detach the unattend ISO to prevent reinstall loops on next ISO boot:
# Remove the unattend configuration DVD drive Get-VMDvdDrive -VMName "REPRO-DC01" | Where-Object {$_.Path -like "*-unattend.iso"} | Remove-VMDvdDrive - You can now delete the
REPRO-DC01-unattend.isofile from your host storage safely.
Deep-Dive: Critical Troubleshooting & Gotchas
While setting up this automation, I ran into several deceptively simple issues that completely halted the unattend engine. If you are customizing this for your own lab, watch out for these traps:
1. XML Schema Sequence Validation Errors
Windows Setup's XML parser strictly validates the order of elements within components according to the XSD schema definitions. If elements are declared out of order, the component configuration will silently fail, landing you on the local login screen with unapplied configurations, or crashing on first boot with Windows could not complete the installation.
- The Trap: In
<component name="Microsoft-Windows-Shell-Setup">under theoobeSystempass, declaring<UserAccounts>before<AutoLogon>throws a sequence violation.<AutoLogon>(sequence index 1) must be defined before<UserAccounts>(sequence index 10). - Collection Index Gaps: Within lists like
<ModifyPartitions>, the<Order>elements must be sequential integers without gaps (e.g.1,2,3). Having1and3with a missing2will cause the second modification to be ignored, meaning your primary OS partition won't format as NTFS and you'll get:There is an error selecting this partition for install.
2. Network Collision on Script Retry
If you run a post-install network configuration script containing New-NetIPAddress against a machine where the static IP is already assigned, the command fails with Instance already exists.
- The Trap: Because the cmdlet throws a terminating error on conflict, any trailing parameters (like
-DefaultGateway) or subsequent commands (likeSet-DnsClientServerAddress) are skipped, leaving the VM with no gateway routing or external DNS resolution. - The Solution: Always flush existing IP interfaces and default routes before calling
New-NetIPAddress:Set-NetIPInterface -InterfaceIndex $adapter.InterfaceIndex -DHCP Disabled -ErrorAction SilentlyContinue Remove-NetIPAddress -InterfaceIndex $adapter.InterfaceIndex -Confirm:$false -ErrorAction SilentlyContinue Remove-NetRoute -InterfaceIndex $adapter.InterfaceIndex -Confirm:$false -ErrorAction SilentlyContinue
3. Deprecated Functional Level Names in Active Directory DS
When using Install-ADDSForest on Windows Server 2025, using functional level parameters that were valid in Server 2016/2019/2022 can fail or throw errors.
- The Trap: Specifying
-ForestMode "WinThreshold"or-DomainMode "WinThreshold"explicitly inside the promotion cmdlet on Server 2025 will throw exceptions on certain Evaluation builds. - The Solution: Omit both
-ForestModeand-DomainModefrom the command. The cmdlet will automatically detect the operating system version and configure the forest/domain functional level to the highest supported level (Win2025) natively.
4. Post-AD-Promotion Auto-Logon Reset
By default, Windows Setup clears the AutoAdminLogon parameters from the registry once a server is promoted to a Domain Controller to prevent unauthenticated console access to a DC.
- The Trap: If you set a
<LogonCount>of2inautounattend.xml, the first logon succeeds and starts the Active Directory promotion. However, once the promotion reboot completes, the DC boots up to a locked Ctrl+Alt+Del prompt rather than logging you back in. - The Solution: Right before running the
Install-ADDSForestcmdlet in your bootstrap script, programmatically re-apply the Winlogon auto-logon credentials directly to the registry:$winlogonPath = "HKLM:\SOFTWARE\Microsoft\Windows NT\CurrentVersion\Winlogon" Set-ItemProperty -Path $winlogonPath -Name "AutoAdminLogon" -Value "1" -Force -ErrorAction SilentlyContinue Set-ItemProperty -Path $winlogonPath -Name "DefaultUserName" -Value "Administrator" -Force -ErrorAction SilentlyContinue Set-ItemProperty -Path $winlogonPath -Name "DefaultPassword" -Value "P@ssword123!" -Force -ErrorAction SilentlyContinue Set-ItemProperty -Path $winlogonPath -Name "DefaultDomainName" -Value "LAB" -Force -ErrorAction SilentlyContinue
5. The Silent Killer: UTF-8 BOM vs. Windows PE (XML Parsing Failures)
- The Symptom: You run your VM creation script, the virtual disks build successfully, the boot injection executes, and the installer loads. However, instead of running hands-free, Windows Setup boots straight into the standard manual interactive "Select language and keyboard" GUI screen. No installation errors are displayed, and the setup logs are completely empty.
- The Root Cause: In Windows PowerShell (v5.1), native output commands like
Out-FileorSet-Contentand file redirects (>) append a Byte Order Mark (BOM) signature (0xEF, 0xBB, 0xBF) to the beginning of UTF-8 files. The Windows Preinstallation Environment (WinPE) XML parser strictly complies with standard XML specifications. When it encounters the leading BOM signature bytes, it fails to parse theautounattend.xmlschema, marks the answer file as invalid, and silently falls back to standard manual setup. - The PowerShell Version Divergence: This is a classic trap that changes depending on your execution environment:
- PowerShell 5.1 (Desktop - Native Windows 11 host): Defaults to
UTF-16 LE(orUTF-8with BOM if-Encoding utf8is specified). - PowerShell 7+ (Core): Defaults to standard, clean BOM-free
UTF-8.
- PowerShell 5.1 (Desktop - Native Windows 11 host): Defaults to
- The Programmatic Solution: To ensure your bootstrap script is 100% reliable across native Windows 11 host environments running legacy PowerShell 5.1, you must bypass the standard output cmdlets and call the .NET file stream writer directly, explicitly passing a boolean to disable the BOM signature:
# Instantiate a UTF-8 encoder with BOM set to $false $utf8NoBom = [System.Text.UTF8Encoding]::new($false) [System.IO.File]::WriteAllText($xmlPath, $xmlContent, $utf8NoBom) - How to Verify Your Files: You can verify whether your generated configuration files contain a leading BOM header by checking the first three bytes of the file in PowerShell:
$bytes = [System.IO.File]::ReadAllBytes($xmlPath)
$hasBOM = ($bytes[0] -eq 0xEF -and $bytes[1] -eq 0xBB -and $bytes[2] -eq 0xBF)
Write-Host "BOM Detected: $hasBOM"
Key Takeaways & Lessons Learned
- Beware the Byte Order Mark (BOM): Standard PowerShell output commands like the Out-File cmdlet or redirection (
>) insert a UTF-8 BOM by default in PowerShell 5.1. The Windows PE engine's XML reader is strict and will completely ignore files containing these leading signature bytes, reverting to manual interactive installation. - Modern Windows Server Ignores SCSI fixed disks for Answer Files: Windows Server 2025 setup ignores
autounattend.xmlon fixed SCSI hard disks (VHDX) for security hardening. Creating a secondary virtual DVD drive and mounting a custom compiled ISO is the modern requirement. - Automate UEFI Boot Sequences Programmatically: Make sure Set-VMFirmware sets the DVD controller as primary over network boot options, preventing PXE boot loops on initial boot.
- WMI Keyboard Emulation Sidesteps Prompts: Emulating keypresses via the Hyper-V Msvm_Keyboard class API virtualization namespace ensures the initial CD/DVD boot prompt window is bypassed without requiring active user focus or physical keyboard input.
- Private Subnet NAT is Best Practice: Configuring host-level NAT gateways and default routing inside the post-install guest bootstrap ensures VMs on isolated switches maintain internet connectivity for updates and cloud integrations.
Part 3 Coming Soon
Don't forget to explore the rest of our website as we build out more content. Stay tuned for more tutorials, tips, and tricks to help you make tech work for you.
If you want to stay up-to-date with regular updates, make sure to subscribe to our free mailing list.